Disc golf is great way to get out in nature, get your steps in and heart up, meet new people, and the sport is growing like crazy! I’m constantly running into new players every time I hit the course, from all walks of life. If you’re just starting out and want to improve your game, or know someone that is, let’s get started with our beginners guide to disc golf!
Choosing your discs wisely
If you’re just starting out you might have only 1 or 2 discs. The number of discs you choose depends largely on the course you’re playing, your skill level, what you feel like hauling out there, and budget. I recommend you have at least 1 Putter, 1 Mid Range, and 1 fairway or distance driver. That’s good enough to learn on, but you’ll soon want to try more shots outs and find discs that you’re comfortable with and feel good for you. Understanding the flight path (via disc flight numbers) can be incredibly helpful in improving your game. Pay attention to those and learn them. When you’re ready to step your game up a bit I’d recommend a bag that consists of:
- 2 putt & approach discs
- 1-2 mid range discs
- 2-3 fairway drivers
- 2-3 distance drivers
That will give you about ten discs, you’ll probably need a nice bag too. Having this many discs gives you more practice as you can throw a few each hole if you’re practicing or with a buddy; giving you more reps and practice to hone each shot.
Know the shots that are available to you
You can throw the disc with many different ways, but typically there are 9 different shots you can make. Think of them like a 3×3 grid. Danny from Physics of Flight on YouTube does an excellent job of describing these shots in the YouTube video below, so watch that to get a great explanation. Understanding the different kinds of shots you can throw will open up how you see the course. New lines will appear as you visualize the flight path of the disc. Did you know you could spike hyzer over those trees to the right to drop into the circle?
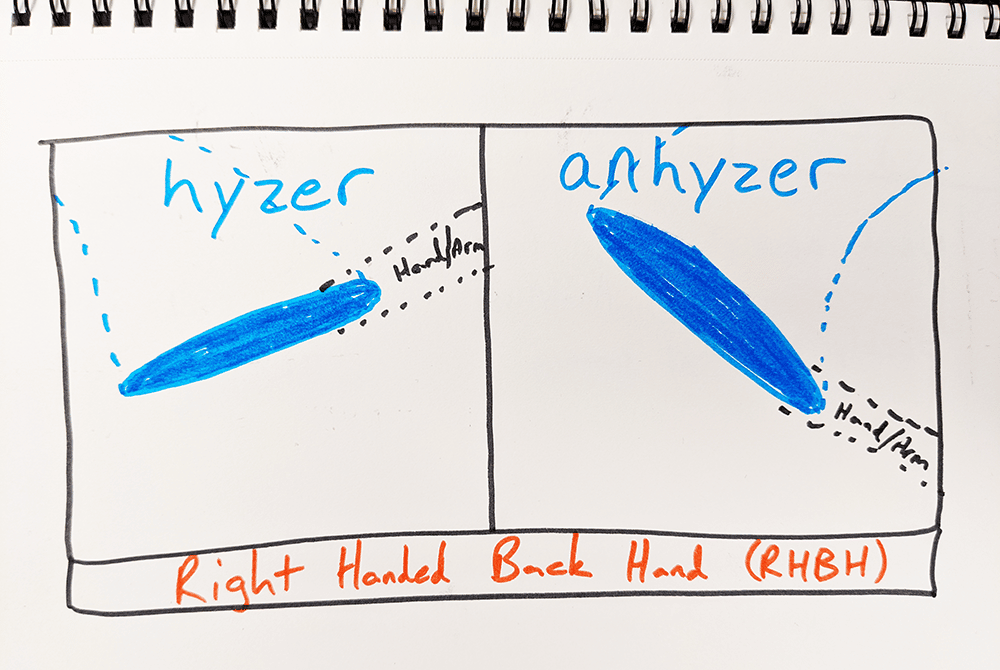
There are two primary disc golf terms that going to need to know asap: hyzer and anhyzer. Both are used to describe the angle of the disc on release.
Hyzer – Hyzer is released with the disc angled downward. For a right handed back hand (RHBH) throw (what you see most of the time unless you’re a lefty), the disc gets released with it sloped downward opposite the body on release. The flight of the disc is going with the eventual fade of the disc (unless it’s understable and you’re going for a hyzer flip).
Anhyzer – Anhyzer is the opposite. The disc is released with the angle upward. This causes the disc to somewhat fight the fade at the end. In result you can make a disc essentially dogleg to the right. Depending on the disc you throw and the amount of fade the disc will either continue to the right, or fade at the end of flight to the left, giving you a little more distance as the disc can take longer to initiate fade.
Develop Your Footwork
Teaching yourself some basic footwork can take your game to the next level. Having confidence in your steps can help you develop a routine, increase your distance and control, eliminate some of the stress on your body, and make you way more comfortable stepping up to the tee box. Develop what feels right for you. Typically you can take 3, 4 , or 5 steps until your release. Practice this without releasing. Remember is like dancing, practice!
On some occasions you may modify your footwork. For example, an anhyzer shot, or roller may start off to the side of the tee to get a better release angle.
Keep Score and Don’t Cheat
I tell you, go download the UDisc app for scorekeeping, finding your next tee box, keeping track of friends and competition, and so much more. It will help you in so many ways. Once you get a bit better, and if if you’re competitive, the leaderboards are fun to watch.
And don’t cheat on your scores. If you blow that 3 foot putt for par, mark it bogey. It will keep you frustrated you missed, and you’ll see improvement in your scores. Same goes for hazards and OB. Track penalties and you’ll try harder to avoid them, it will make the game more technical, and you’ll be better prepared and less disappointed at tournaments and weekly’s.
Practice Putting
It’s a no-brainer. There’s a reason they say, “Drive for show, putt for dough.” You can drastically improve your game with better putting. I have a disc golf basket in my yard with distances marked out of 10′, 15′, 20′, 25′, and 30′. I also have a stack of random putters that I’ve acquired while trying to find the best feel for my hand and release. After trying all the Aviar plastics, a Kastoplast, and Discraft Roach, I’ve recently have settled on a D-Line DGA Steady #001. I can’t explain it, but the disc just feels so much better coming out of my hand.
There’s a lot to putting: the stance, the release, the timing, the aim, and the mindset. It can be overwhelming to focus on all these things at once. Repetition and muscle memory is key. It takes time to build it, but stay dedicated and you’ll thank yourself later. Train your mind not to think, just feel, so that putting feels natural. Watch some YouTube videos for all the elements above to hone those. Perfect Putt 360 is also another great app that will help you challenge yourself to improve.
Get a Basic Understanding of The Rules
It’s fun to just go out and throw, but there are actual rules that can help you improve and feel more comfortable out there playing when others are present. Spend some time flipping through the official rules from the PDGA (Professional Disc Golf Association).
Join a Weekly
Weekly’s give you the opportunity to see how other approach shots and you can learn a ton from better players. There’s usually a bit of a buy in/member dues, and some of which can go into a prove pot. Google your local course for their website, group, or look for them on UDisc.
Monitor Your Workout
One of the reasons I play is to get stay in shape. I recently got a Garmin Venu smartwatch that tracks everything – steps, elevation, maps the path, heart rate, intensity – everything! Also has a great app for your phone too. Every time I disc golf, I end up hitting my steps goal. It also helps me justify getting out there and doing the work out. Tracking my burned calories makes me feel okay with eating like a madman afterwords too.
Learn From The Pros
Check out JomezPro on YouTube. JomezPro is rapidly advancing Disc Golf with their professional videography and commentary. Though 2020 has stalled many tournaments, they have a bunch of video from previous championships. Again the commentary is great and the production is high level. Good job guys!
Take Notes
Nail a roller with a DX Leopard3 on hole #7? Write it down and you won’t forget next time you’re trying to remember what disc you’ve birdied with. After a while you may have several discs that will yield you the best shot. I don’t love hauling out my massive phone on the course and messing with tech outside especially when I’m playing with or near others. So you could carry a small notebook.
Experiment
Try new discs out and and throw them forehand, backhand, hyzer, and anhyzer. Get something totally understable (negative turn rating) and experiment throwing it in all sorts of ways. Try a tomahawk, grenade, or a thumber.
Oh yeah, and have fun!





One Response
This article is really helpful and makes things easier for newbies to learn disc golf. Awesome!